Friday, September 9, 2016

Configuring Wifi on Ubuntu Server 16.04.x LTS

This is the tale of how I set up the wifi interface on Ubuntu server 16.04 LTS as part of a leaf router with a wifi backbone and an ethernet sub-net.

Finding Device Names in Ubuntu 16.04.x

In this latest LTS release, Ubuntu no longer uses the traditional interface device names like "eth0" or "wlan0" for some reason. I'm sure there is some explanation for this, but it does mean that the new names must be discovered. This information can be found by searching the output of the "dmesg" command for the old names:

     dmesg | grep eth0
    dmesg | grep wlan0
    
In both cases there will be a line that states (in part) for example: ".. renamed from eth0 ..". Those lines will reveal the current names of the devices. Just to keep things interesting, one system I upgraded in-place from Mint 17.3 to Mint 18 (based on Ubuntu 16.04.x) kept the traditional device names. Go figure.

Configuring Network Interfaces, Old School

Since the server distribution does not use NetworkManager and has no GUI, network interfaces must be configured the old-fashioned way: by creating and editing configuration files.

The first thing is to take care of the /etc/network/interfaces file, which defines the network interfaces. My interfaces file looks like this:

  =======================================================================

  # This file describes the network interfaces available on your system
  # and how to activate them. For more information, see interfaces(5).

  source /etc/network/interfaces.d/*

  # The loopback network interface
  auto lo
  iface lo inet loopback

  # Ethernet NIC is the "leaf" sub-net, needs static address -jrl
  auto enp9s0
  iface enp9s0 inet static
  address 10.10.1.1
  netmask 255.255.255.0
  broadcast 10.10.1.255

  # Just define the wifi interface, don't bring it up prematurely -jrl
  # auto wlp12s0
  iface wlp12s0 inet dhcp

  =======================================================================

The ethernet interface (enp9s0 formerly known as eth0) will be my "leaf" subnet and needs a static IP address because it will become the default router address for the sub-net clients, as well as the DHCP server for those clients.

The wifi interface (wlp12s0 formerly known as wlan0) is merely defined here, and not initialized. Initializing this interface requires several additional steps. In this example the wifi NIC will be a DHCP client of the main network, but static assignment is another option. This NIC receives a static dhcp address assignment from the DHCP server on the main network (eventually). This is important, since this router does not implement NAT it's address must be known to the default router on the main network as the gateway to the leaf subnet. Notice in particular that the line "auto wlp12s0" is commented out, this is because otherwise the system boot sequence will "block" for 5 min. and 10 sec. while it tries (and fails) to initialize the wifi interface. The "auto" line doesn't have to be there, I left it commented as a reminder.

The next step is to prepare what is needed to configure and initialize the wifi interface. This will require the generation of a configuration file for the "wpasupplicant" utility that will be used to establish an association between the local wifi NIC and the wifi access point on the main network. The first step is to generate the skeleton of wpasupplicant configuration file. This is done with the "wpa_passphrase" utility. This utility takes two arguments: the SSID of the network you wish to join, and the WPA passphrase that is needed for that network. In this example, the SSID is "CoreNet" and the WPA passphrase is "SuperSecretPassword":

wpa_passphrase CoreNet SuperSecretPassword >/etc/wpa_supplicant/wpa_supplicant.conf

The command line above is performed as root or with sudo. After the file is created, restrict the permissions, you don't want the passphrase (or the generated key) to be world readable. When first generated, the skeleton file looks like this:

network={
ssid="CoreNet"
#psk="SuperSecretPassword"
psk=e098eb13f5467b23b186f013a211f6399aebc6e462758898d71d23e0949cf370
}

I added a couple of directives and took out the clear-text of the key so the final file looks like this:

network={
ssid="CoreNet"
scan_ssid=1
key_mgmt=WPA-PSK
psk=e098eb13f5467b23b186f013a211f6399aebc6e462758898d71d23e0949cf370
}

Once this file is finalized, we are ready to begin initializing the NIC. First step, bring the interface "up"

ifconfig wlp12s0 up

Next we invoke wpasupplicant with the configuration file we generated:

wpa_supplicant -Dwext -i wlp12s0 -c /etc/wpa_supplicant/wpa_supplicant.conf -B

We are almost there. At this point the interface is associated with the access point for "CoreNet", but we have no IP address. We obtain our IP parameters from the DHCP server on the main network through the use of the "dhclient" utility:

dhclient wlp12s0

Now we should be in business.

Once the "interfaces" and "wpa_supplicant.conf" files are properly set up, we can automate the initialization at boot time by placing the needed commands in the /etc/rc.local file, which on my system looks like this:

  =======================================================================

  #!/bin/sh -e
  #
  # rc.local
  #
  # This script is executed at the end of each multiuser runlevel.
  # Make sure that the script will "exit 0" on success or any other
  # value on error.
  #
  # In order to enable or disable this script just change the execution
  # bits.
  #
  # By default this script does nothing.
  #
  # wait until things settle down -jrl
  sleep 10

  # initialize wifi interface the hard way -jrl
  #
  ifconfig wlp12s0 up
  wpa_supplicant -Dwext -i wlp12s0 -c /etc/wpa_supplicant/wpa_supplicant.conf -B
  dhclient wlp12s0


  exit 0

  =======================================================================

There may be slicker ways of bringing up a WPA protected wifi interface on Ubuntu server, but this worked for me.

The most useful documentation I found were the manual pages for "wpa_passphrase", "wpa_supplicant.conf" and "wpa_supplicant". Here are some online links for those pages:

http://linux.die.net/man/8/wpa_passphrase

http://linux.die.net/man/5/wpa_supplicant.conf

http://linux.die.net/man/8/wpa_supplicant


Thursday, August 11, 2016

Secure Video Calling on Linux: Wire

I have used Skype for video calling since before it was bought by Microsoft. At the time it was the most widely used video calling service that had a Linux client. Since that time the Linux client has been neglected: the 32-bit-only Linux client is v4.3.0.37, while the 64-bit Mac client is v7.33.306. The Linux client lacks several key capabilities, such as group video calling. Ironically I like the user interface on Linux better than either the Windows or Mac clients. As I write this Microsoft has announced that they are working on a major upgrade to the Linux client. That client is in Alpha development stage right now and the video calling capability has not yet been added. It looks as if Linux will always be a secondary platform (at best) for any Microsoft development.

So I have been looking into possible alternatives for cross platform video calling. Since I already had a Google account, Google Hangouts is an acceptable alternative and in some ways better than Skype and allows group video calls. Hangouts does not have a native client for desktop systems, it is web based and will run on anything that can run Google Chrome (or other modern browsers). There are native clients for iOS and Android. The wide adoption of Hangouts is probably second only to Skype. Most of the people that I video call already have GMail accounts, so that removes one barrier: no new account ID an password to keep track of.

One aspect of video calling that is important to me is privacy. In this regard Skype is a loser, as demonstrated in this Ars Technica story.

Hangouts is probably better, but I really don't know how far to trust Google. So far the benefits outweigh the risks, but I would prefer a system that is more secure. This led me to investigate Wire.com.

Wire.com was started by some of the founders of the original Skype project, before it was sold ultimately to Microsoft. It's primary goals were to establish secure communications: instant messaging, audio and video calling, and file transfer. Wire is cross-platform, it runs natively on Windows, Mac, iOS, and Android plus it has a web-based client that runs on modern browsers including those on Linux. Strong, open-source, end-to-end encryption is used with all Wire's protocols. You can read all about it in their "Wired Security Whitepaper".

Oh yeah, another important feature of Wire is that their servers are hosted in Switzerland, where the laws favor the protection of privacy. They take pains in their operation to preserve your privacy, spelled out in their "Wire Privacy Whitepaper".

While the Wire web client's navigation is not what I could wish, I was able to get everything to work without too much trouble. One thing that is missing from Wire that both Skype and Hangouts have is a "presence" indicator for your contacts. You can't tell when any of your contacts are actually on-line. I suspect that has something to do with maintaining privacy, but it means that you may have to arrange a time in which you and your contacts will be on-line and ready to receive calls. Or you can just try ringing them in Wire; like what we used to do when the best form of communication was a telephone call. I have yet to try out group calling, but that is something supported with Wire.

So now I have two useful, up-to-date, alternatives to Skype: Google Hangouts and Wire. Since both have web clients, I can even use them on my Chromebook as well as my Linux Mint desktop. Skype has never been available to Chromebook users, though their Linux client, once fully operational, might allow them to incorporate Linux support into their web service, allowing the Linux-based ChromeOS to finally use Skype (fingers crossed, but I'm not holding my breath).

Now to convince my Skype correspondents to use Wire or Hangouts, or both.

Update (12 Oct. 2016)

Wire.com has just released a beta version of a Linux desktop client app. On Mint it is installed from a .deb file and works pretty well. One quirk: it identifies itself as "Wire for Windows", but it is identified also as running on a Linux desktop. The version number is "newer" than the Mac desktop client (v2.11.2661 vs. v2.10.2652). 

Tuesday, February 2, 2016

Dual-Stack OSPF Routing with Quagga

In order to better learn about IPv6 I wanted to set up dual-stack routing on a virtual network. I chose to implement Quagga with OSPFv2 for IPv4 routing and OSPFv3 for IPv6 routing. I did this primarily because the price was right (free) and it could be implemented on a regular Ubuntu server that could also be used for other network support protocols (DHCP, DNS, multicast routing etc.). As usual everything here was implemented using VirutalBox on a Linux Mint host. What follows are examples of how to set up Quagga for dual-stack routing.

I chose OSPF because it was a robust, modern Internal Gateway Protocol (IGP) that was relatively easy to set up. I make no claim that the example presented here is perfect or even optimal, I only claim that I tried to keep it simple and that it works for me. I'm writing this for two reasons: to preserve what I have learned (my memory isn't what it used to be) and because a concrete example would have been helpful while I was learning this, so I thought I would supply one for those learning this stuff themselves.

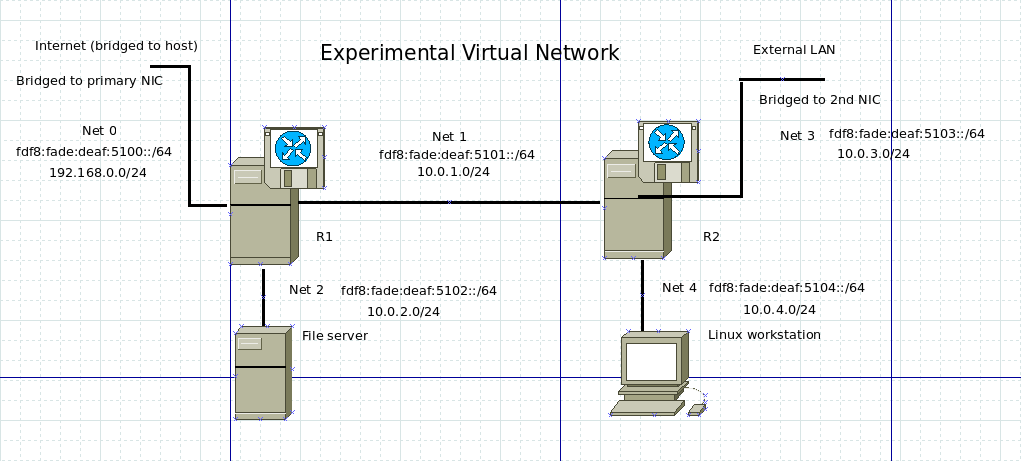
In order to better follow this exercise, below is a diagram of the virtual network used. Note: the IPv6 prefixes are not my actual prefixes (I'd rather not share those publicly) but dummy addresses utilizing IPv6 "Unique Local IPv6 Unicast Addresses" (RFC 4193).  Such addresses can't actually be routed over the Internet. My real IPv6 addresses route just fine.


The three hosts that are the focus of this discussion:

  • gator.jrl.home is a pfSense dual-stack router with BIND add-on
  • route1.jrl.home is Ubuntu server v14.04.3 with Quagga and DHCP server
  • route66.jrl.home is Ubuntu server v14.04.3 with Quagga and DHCP relay

It's important to know the static IP addresses for these hosts:

Router Addresses


All addressing and routing on "Net 0" on the diagram are statically assigned (no DHCP or OSPF routing). The pfSense router (gator) had static routes for Nets 1 - 3 added (for both protocols) and in addition new firewall rules added to allow hosts on the new networks to access gator and pass Internet traffic as well as local traffic on Net 0.

After installing "route1" and "route66" from ISO images files and updating them static addresses were assigned to all interfaces and packet forwarding was enabled through /etc/sysctl.conf, setting the following:

  • net.ipv4.conf.all.forwarding=1
  • net.ipv6.conf.all.forwarding=1
This turns your server from a multi-homed host into a router. After this step it's time to install Quagga from the repositories and edit some configuration files.

In the /etc/quagga directory on each router there are 5 text files. For the examples presented here only 4 of them need to be altered or created. You can leave debian.conf untouched it just tells the quagga processes where to run their terminal processes (more on this later).

The zebra.conf file is the one that requires the most information. Here is the sample zebra.conf file for route1

zebra.conf for route1.jrl.home


The IPv4 information should be familiar to anyone setting up Linux on a network. Some of the IPv6 addresses used here are all "Link-local" addresses for the interface in question, which can be discovered by using "ifconfig". IPv6 link-local addresses begin with "fe80". Routing information is passed from router to router using the link-local addresses in OSPFv3.

Near the bottom of each interface definition there are 4 IPv6-related directives that could use some explanation.
  • no ipv6 nd suppress-ra - means do not suppress IPv6 router advertisements
  • ipv6 nd managed-config-flag - means that DHCPv6 is in use for addressing
  • ipv6 nd other-config-flag - means that DHCPv6 info other than addresses are in use
  • ipv6 nd prefix fdf8:fade:deaf:5150::/64 - means advertise this prefix

Unlike DHCPv4, DHCPv6 does not "handle" routing information. That function is left to the router advertisement daemon that is part of an IPv6 router (in this case quagga). The IPv6 protocol has a powerful Stateless Autoconfiguration (SLAAC)  capability that does not rely on DHCP for addressing. Address assignment and routing information are configured automatically. What does not get assigned automatically are: addresses of the DNS servers, the host's domain name, and alternate search domains etc. As set up in these examples, each workstation will end up with one IPv4 address and four IPv6 addresses:
  • Link-local address derived from the hardware address and assigned by the kernel
  • SLAAC address also derived from the hardware address and the prefix from the router
  • A privacy address that is dynamic, random and combined with the prefix from the router
  • A managed address supplied by the DHCPv6 service
Depending on your operating system any of the three "global" (non link-local)  IPv6 addresses can be used by applications to contact remote systems. On my systems the default is to utilize the "privacy address" when contacting remote systems. Since that address is dynamic and random (on every reboot for instance) it makes it harder to track you on the Internet. Any of the 3 global addresses can be used by other systems to contact your workstation (i.e. ping6).

DHCPv6 is not required for automatic IPv6 address assignment, as long as the host being configured "knows" it's own domain and the addresses of it's DNS servers (usually by static assignment). It is also possible to distribute only that information (domain name and DNS server addresses) using DHCPv6 and leave the automatic addressing to SLAAC with information supplied by the router advertisements. The "ipv6 nd other-config-flag" directive is there for exactly this sort of setup.

To continue with the configuration of route1, let's look at the /etc/quagga/ospfd.conf file:

ospfd.conf for route1.jrl.home
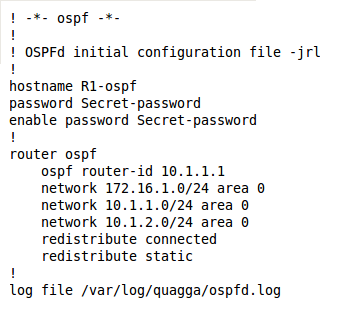
This is pretty simple it just places the interfaces (represented by their IPv4 addresses) into the same OSPF routing area, then redistributes any learned routes and any statically configured routes into that area. This is all that is needed to configure the OSPFv2 daemon (IPv4 routing daemon) in quagga.

Now let's look at the OSPFv3 (OSPF for IPv6) routing configuration for route1 contained in the /etc/quagga/ospf6d.conf file:

ospf6d.conf for route1.jrl.home
This accomplishes the same thing for IPv6 as ospfd.conf did for IPv4. This time the interfaces are designated explicitly by their kernel names (instead of indirectly as in ospfd.conf). My guess is that the OSPFv3 was developed later and perhaps by another developer who "did it his way". I find this way "cleaner".

The same configuration files need to be created for route66 and they look very much the same as the OSPF configuration for route1:

ospfd.conf and ospf6d.conf for route66.jrl.home


The zebra.conf file is unique for route66, since it reflects the actual hardware in use, with unique hardware and IP addresses:

zebra.conf file for route66.conf

Finally there are two files that are the same on both route1 and route66 the /etc/quagga/daemons and /etc/quagga/debian.conf files:

daemons and debian.conf file for both route1 and route66


The "daemons" file determines which daemons within the quagga suite should actually run and the debian.conf file describes how and where the various  protocol daemons should  listen for terminal connections. Each of the protocols in use (ospfd and ospf6d  as well as zebra in our case) has a command-line interface accessible via telnet. It has some similarities to the command interface on cisco routers. Each of the three daemons runs on a different port on the localhost interface of each router:
  • telnet localhost 2601 - will get you to the command interface of the zebra daemon
  • telnet localhost 2604 - will get you to the command interface of the ospfv2 daemon
  • telnet localhost 2606 - will get you to the command interface of the ospfv3 daemon
Those "enable password" statements at the top of the configuation files (zebra.conf, ospfd.conf and ospf6d.conf) set the passwords you will have to supply to actually get to those command interfaces.

Once logged in, typing a question mark will get some help with the commands. Once you have (re-)started the quagga daemons on both routers, you should be in business.

There are resources on the web for learning Quagga. One site is here: http://www.nongnu.org/quagga/docs.html


Thursday, December 3, 2015

Yet Another Active Directory Alternative: the Univention Corporate Server

Previously I have "test-driven" Zentyal, a MS Windows Small Business Server alternative and Active Directory domain controller (http://anorak-tech-notes.blogspot.ca/2015/01/zentyal-and-freeipa-foss-id-management.html).

This post is a brief look at another AD domain controller alternative, the Univention Corporate Server (UCS). In my case it is the free "UCS Core Edition" version 4.1. This is by no means a complete review or evaluation, merely my impressions of the product.

The best news is that UCS provides another free alternative to MS Windows Server and it's licensing expenses. Univention touts it's integration with cloud services and SAML single sign-on features along with Docker support to differentiate their product with others. Those features were irrelevant to my use case, so while those features are not important to me, they might be invaluable to others.

My use case is hypothetical. I evaluate based on how an IT product would fit into a K-12 school network supporting student instruction. The basic need is for secure, distributed, cross-platform, ID management and file service. Beyond that, how easy would it be for novice system administrators to deploy and manage these services. Cost is always a consideration.

As with Zentyal, ClearOS, and SME, UCS can fulfill many roles on the network. In my case only directory services and file service were investigated. The UCS server was installed from the downloaded ISO DVD image under VirtualBox v4.3.34 on a Linux Mint 17 64-bit host. The clients of the UCS server were Linux Mint v17.2 Mate and Linux Mint Debian Edition v2 (LMDE) Mate workstations. The clients were also virtual machines running under VirtualBox. Both Server and clients were on a VirtualBox internal network, connected to the outside world via a virtual pfSense firewall router supporting IPv4 NAT and IPv6 routing.

Installation was pretty straight-forward and worked well. One of the features of UCS not supported by Zentyal was IPv6 support, which I wanted to investigate. During installation I was able to specify an IPv4 static IP address, but not the IPv6 address, which was left to SLAAC.

Because I was interested in UCS's usefulness as an Active Directory alternative my first test was to see if I could join the Mint and LMDE workstations with the UCS server as I would with MS AD or Zentyal. I used "realmd" to successfully join the workstations to the domain, using the same directions I worked out previously here.

None of the problems I had were major, but they were important. First, the web-based administration user interface was non-intuitive. I'm sure the developers loved it but I found it very needlessly different from anything else I've used with a menu. This is especially important for novice sys-admins (like teachers).

One limitation of UCS, shared by Zentyal, was that the DNS server was not suitable for use as the primary for any network beyond the simplest. This limitation means that I could only recommend that the AD domain be run as a sub-domain within an organization; that way the UCS DNS server would only have to deal with the AD domain and all other DNS needs could be met with a more flexible DNS implementation (even the BIND package in pfSense for example). Likewise, the DHCP server supplied with UCS is not very flexible either. Here is a screenshot of the form for configuring DHCP service:


No provision for static assignments, let alone boot information for thin clients. Again I would use another implementation for DHCP service instead of UCS (or Zentyal).

When I went to check out UCS's IPv6 functionality, the first problem was establishing a static IPv6 address and entering it into DNS so that IPv6-only clients could find the server. I like to number my servers with host address portion consisting of sequential small integers (like ::1 for default gateway, ::2 for directory servers, ::3 for file servers etc.) but I ran into a problem; here is a screenshot that illustrates the location of my problem:


Nowhere in the documentation could I find out how to supply an acceptable "Identifier". Instead I merely checked the "Autoconfiguration (SLAAC)" box, then manually entered the AAAA record in the DNS entry for the server. Luckily SLAAC-generated addresses are static (as long as the host remains on the same network). Once the addressing was straightened out, I was able to have services accessible over IPv6 addresses, in contrast to Zentyal which was IPv4 only.

Pros

  • Easy installation
  • IPv6 support
  • Web-based management (no Windows tools needed)
  • Cloud and SAML support (un-tested)
  • Provides an AD alternative (Kerberos, LDAP, AD schema, DNS SRV RRs etc.)
  • Linux clients can use "realmd" for joining the AD domain
Cons

  • Non-intuitive user interface
  • Limited DNS and DHCP functionality
  • Extensive yet incomplete documentation
Conclusions

If I were charged with deploying a free AD alternative, as of this writing I would choose Zentyal over UCS for my use case. I simply couldn't turn a novice over to the UCS user interface, it would be a support nightmare. I hope that UCS improves over time because I feel that IPv6 support will become more important in future. Both UCS and Zentyal are developed in Europe; Zentyal in Spain and UCS in Germany. This can make the translations of documentation more problematic for English speakers, making the user interface intuitive more important than otherwise might be the case. Both UCS and Zentyal are usable and useful as a limited MS AD alternative, my hope is that they become more refined and robust over time.

Links

Univention Corportate Server: https://www.univention.com/products/ucs/

Sunday, August 23, 2015

Tale of Two Tunnel Brokers: Gogo6 & Hurricane Electric

Late in 2013 I decided it was time I got serious about learning the essentials of IPv6. I had played with the protocol shortly after the turn of the millenium, but at the time it's actual use case was in the future. With the exhaustion of the IPv4 address space, the future has arrived. Let me be clear, since I am now retired and have no responsibility for building or maintaining a University network anymore, I am still "playing", but I am now a bit more systematic about it.

Gogo6/Freenet6

Since my ISP does not support IPv6, the only way I could gain anything resembling a real life experience with the protocol was to use an IPv6 tunnel broker. I initially settled on Gogo6/Freenet6 mainly because the client software was in the Linux Mint repository and it could work with IPv4 NAT-based home networks. I later tried Hurricane Electric as a tunnel broker in conjunction with my home firewall-router, a NetGear running "Toastman Tomato" firmware.

Gogo6/Freenet6 provides IPv6 tunneling services for free. There are two forms of tunnels: anonymous and registered. Anonymous tunnels use a dynamically assigned host address at each connection. Registered users receive a statically assigned IPv6 address registered on their  DNS servers (both forward and reverse zones). Registered users can also request a /56 address prefix delegation, which gives you 8-bits of subnet addressing (255 subnets of /64 networks). I wanted to investigate dual-stack routing, so I asked for and received a /56 address prefix delegation.

After registering with Gogo6 and Freenet6, getting the gogoc service took a bit of tweaking. In my /etc/gogoc/gogoc.conf file I had to enter my userid and passwd information, and set the following parameters:

server=montreal.freenet6.net   # those in Europe can use amsterdam
always_use_same_server=yes 
auth_method=digest-md5         # not the best, but better than nothing
host_type=router               # I wanted my sub-nets
prefixlen=56                   # can be 128, 64 or 56
if_prefix=eth0                 # interface for router advertisements
tunnel_mode=v6anyv4            

In the /var/lib/gogoc/tsp-last-server.txt file I pre-loaded the single entry "montreal.freenet6.net", since one weakness of Gogo6/Freenet6 is that while they have several server locations, your registration is only recognized in the one you register for, in my case Montreal.

Once this was done, it worked as advertised and I had the basis for my experimental dual-stack network. Here is a simplified diagram of one of my experimental networks:


I am not using my real IPv6 addresses on the diagram, the ones labeled here are similar to RFC1918 addresses for IPv4. The "File Server" here is a generic stand-in for any of several servers providing various services, such as: XMPP, Active Directory services, NT4 domain services, NFS file server, IPA Directory server, LDAP server etc. R1 and R2 are Linux Mint servers running Quagga, BIND, ISC DHCP and supporting services. All hosts on the net are virtual machines built with VirtualBox running on a Linux Mint v17 host with 3 NICs.

Gogo6/Freenet6 works very well. I don't run IPv6 full time, I turn it on and off with the "service" command as needed. One thing to keep in mind is that IPv6 is tunneled right through my firewall, so I have to make sure that any services are secured. All ssh servers are address restricted via /etc/hosts.allow and password authentication is turned off (authorized keys only) for instance.

Advantages of Gogo6/Freenet6

I was able to run IPv6 from within my NATed home network where I had great flexibility in routing. The delegation of a /56 IPv6 prefix meant that I could create an elaborate dual-stack intranet as an excellent learning platform. The ability to have an anonymous tunnel (for IPv6) can be a plus for some users. I run a second registered host tunnel on my laptop, and since it is a static address with proper DNS entries I can log into my home IPv6 net even with address restrictions.

Problems with Gogo6/Freenet6

Since my home firewall/router doesn't have the "gogoc" client, I can't run Gogo6/Freenet6 on my Netgear/Tomato box.

Twice I have "lost" my /56 prefix assignment and a different one was assigned. There is very little tech support and I never found out exactly why this happens. Both times I had to re-number my networks and update my local DNS records. My tunnel address was never lost, only the /56 prefix.

Just recently the Montreal Gogo6/Freenet6 server went down completely (Amsterdam stayed up) for a period of nearly two weeks. I received no announcement about this but on their community forum I found out that it was being worked on and when it came back up, all was well. Apparently this is a volunteer-run service and while I am thankful for it, I would not trust a production network to this service.


Hurricane Electric

When Gogo6/Freenet6 was "down" for two weeks and I was unsure if or when it would be back up, I looked into Hurricane Electric briefly. I was able to get my Netgear/Tomato firewall router working with an IPv6 tunnel once I registered at HE. I received a /64 delegation and an optional /48 prefix. I had planned to re-number my virtual network (again) and use HE as my tunnel broker.

First the good news. I was able to get the tunnel and the /64 prefix running on my home network. The bad news is that the Netgear/Tomato router has no provision for static IPv6 routes (other than default) nor any IPv6 routing services (OSPFv3 for instance), so it meant that I couldn't run my virtual IPv6 intranet with the delegated /48 prefix, or rather I could, but they couldn't be connected to the outside world. This is not a problem with HE, but a limitation of Tomato.

The further bad news (for me) is that I don't have a statically assigned public IPv4 address, so once I had to power-cycle my firewall/router (we have a lot of power outages here in America's paradise), I lost my tunnel endpoint address and HE tunnel stopped working. Manually editing my tunnel settings at HE should have fixed it, but I had trouble there too. I might have been able to work through these problems, but since I would still not be able to run my virtual net the way I wanted, I didn't try very hard. About that time Gogo6/Freenet6 came back on-line and I switched back.

Advantages of Hurricane Electric

The HE 6-in-4 tunnel is more generic and widely supported in commodity home firewalls than gogoc. If one had a statically assigned public IPv4 address from one's ISP, I think HE would be a better choice for most home users looking for solid IPv6 connectivity than Gogo6/Freenet6. Most home users wouldn't need elaborate routing, the /64 prefix would cover even the largest single home LAN.

Disadvantages of Hurricane Electric

HE really works best if you have a static public IPv4 endpoint for your tunnel. I didn't use HE long enough really wring it out, and the problems I had were mostly due to my own environment (bad local power, limited router functionality) rather than with HE.

Conclusions

For my purposes (self education and playing with technology) Gogo6/Freenet6 has worked pretty well, even with prolonged outages and changing prefix delegations. It is likely the only tunnel broker I can use without upgrading some of my home network equipment (pfSense router for instance) and paying my ISP for a static public IPv4 address. If only my ISP would just upgrade to support native IPv6  ...

With a better firewall/router and a static tunnel endpoint, HE would be a good choice and I think it may be more reliable and better supported than Gogo6/Freenet6. HE would be my first choice for a production network if those two criteria were met and I still needed the services of a tunnel broker.

Update 14 April 2016

It appears that Gogo6/Freenet6 is closing down. I received the following notice:

"Hello.  After 6 years of IPv6 goodness, gogoNET is closing down.  With over 100,000 registered members I’d like to think that we made a difference in helping the world transition to IPv6.

The Freenet6 service will also stop accepting new users and it is unknown how long it will continue to operate for existing users.  If you rely on one of our free tunnels or address blocks you should start looking for alternatives.

The company gogo6 stopped operating almost two years ago.  The gogoNET community and FN6 tunnel broker service lost money for years before that but I kept it running because it helped people, not only to get IPv6 but for some people it provided access to the uncensored Internet from countries that try to restrict it.

gogoNET will go dark on April 23, 2016.  How long Freenet6 will continue to operate is uncertain since its IPv6 block from ARIN has not been renewed.

With the transition to the Internet of IPv6 well on its way I have shifted my focus to help with the transition to the Internet of Things with my new site, http://www.iot-inc.com.  Hope to see you there, Bruce"

Links

Gogo6/Freenet6 http://www.gogo6.com/
Hurricane Electric http://he.net/

Saturday, April 4, 2015

Directory and File Service for All: ClearOS & SME

In a previous post I discussed Zentyal and FreeIPA as two options for FOSS ID management. Those servers provided directory service via LDAP and security services via Kerberos. In the case of Zentyal it provided a useful sub-set of Active Directory services that could (in some cases) replace a Windows small business server. The two servers under discussion today are a bit different, but supply some of the same features.

Both SME Server and ClearOS provide central ID management and CIFS file service, but without Kerberos or Active Directory compatibility. Both provide and easy to use web-based management interface, no need for Windows tools for managing your server.

SME Server


The Koozali SME (Small and Medium Enterprise) Server provides an easily set-up all-purpose network service appliance for small networks. It is based on CentOS (currently v6.6). In addition to ID management and CIFS file service, SME also provides many other services, whether you want them or not. At installation there are 3 options for the role that SME may play:

1. Server and gateway
2. Private server and gateway
3. Server only

I chose the "Server only" option, since I already had DNS, DHCP and routing implemented on other net components. Beyond the directory service (via OpenLDAP) and CIFS file service (via Samba v3.6.x) that I wanted, I also had an email server (SMTP/IMAP/POP) that I did not want. The trade off here is that SME is very easy to set up, but it is not very modular nor very flexible. Further, Samba does not use LDAP for it's credential store. By default, the server does not use LDAP for it's own authentication, although that can be changed by running a script apparently. Password synchronization between LDAP and Samba happens externally. So this means that there are 3 separate credential stores on SME: /etc/passwd,shadow, LDAP and Samba.

For my purposes I wanted a central directory service for authentication and a CIFS for personal and shared directories for 3 platforms: Linux, MacOS, and Windows. SME implements a Windows NT4-style domain through Samba version 3.6.x and provides the directory service via OpenLDAP version 2.4.x over SSL. SME gave me what I needed, but I was rather disappointed that it included email services that I did not need or ask for. I did not try out the gateway services: Firewall, DNS, DHCP and web content filtering.

Pros

  • Provides LDAP over SSL for authentication and general directory service
  • Provides Windows NT4-style domain for CIFS file service
  • All services are open source and free of charge
  • Easy to set up and manage


Cons

  • No IPv6 support
  • Provides Email whether you need/want it or not
  • Divides authentication into 3 separate realms


ClearOS


ClearOS has some similarities with SME Server. Both are based on CentOS (currently v6.6). Both use OpenLDAP and Samba v3.6.x for directory and CIFS file services respectively. Both can provide gateway services as well as email services in addition to the directory and file services. Both implement Windows NT4-style domains for CIFS file service. There are some significant differences as well.

ClearOS is much more modular than SME, you add only the services that you need. Authentication is centralized in LDAP for all services. ClearOS can provide commercial services and subscriptions to extend it's capabilities.

My requirements were the same as those for SME server: Directory and file services for Linux, MacOS and Windows. In addition I did try some of the gateway services with ClearOS, but they won't be discussed here.

The various services come in packages that you can add individually. Once added, I could not find a means to "un-add" them through the management interface. Once the package is installed, you are stuck with them, so choose carefully. Here is a screen-shot of the modules I installed (including the gateway services):


I tested the "Community" edition of ClearOS. Some of the available packages are only available in the commercial or "Professional" edition. All of the modules I tried out were free of charge. One of the commercial (not free) additions available in the ClearOS "Marketplace" that I am interested in is the "Google Apps Synchronization" service. At present I don't have a Google Apps domain, but even if I did it would require the "Professional" version of ClearOS. The prices for the commercial services and subscriptions are generally rather reasonably priced. The "Community" vs. "Professional" dichotomy is no different than many "freemium" offers for software on the net. I would have preferred a straight commercial support option rather than splitting the server into two distributions. The Community edition is quite adequate for many purposes. There were 79 free Marketplace applications available for the Community edition.

Pros

  • Provides LDAP over SSL for authentication and general directory service
  • Provides Windows NT4-style domain for CIFS file service
  • Easy to set up and manage
  • Flexible modular architecture
  • Extensible via add-on "Marketplace" applications


Cons

  • "Professional" version needed in some use cases
  • Marketplace applications can be added but not removed
  • Limited IPv6 support (optional and set up manually; not all services supported)


Conclusions


The use of Windows NT4-style domain may seem a step backward from Active Directory or even FreeIPA, but it has it's uses. The Samba implementation of NT4-style domains does not require changes to existing DNS domains (as both AD and FreeIPA do), since they use a separate naming service (WINS). This means they can be more easily integrated into existing networks without the need to create sub-domains (as I have done in the past). The CIFS distributed file system may not be the best available, but it is the most widely supported and the NT4 domain makes such file systems easier to share in a diverse network supporting all three major platforms (Linux, MacOS and Windows).

Of the two systems discussed here, I prefer ClearOS to SME. Both are usable and useful, but the modularity and extensibility of ClearOS, along with the unified LDAP authentication tip the balance for me. The commercial nature of ClearOS will dissuade many users. The model I have in mind when evaluating these systems is a small K-12 school. Schools have needs that many small businesses and home networks do not have. The use of Chromebooks in schools is widespread and on the rise, so integration of the campus network with a Google Apps domain that can be used to manage Chromebooks would be a plus; the availability of a packaged GADS application that would allow managing accounts and passwords in one place is a real win for ClearOS, even if it costs $125/year through their "Marketplace".

Links


SME Server: http://wiki.contribs.org/Main_Page

ClearOS: http://www.clearfoundation.com/Software/overview.html

Notes on LDAP client authentication:
https://drive.google.com/open?id=0B6yzbC9y4l-CMkVtejRKaUEzX0k


Monday, January 12, 2015

Zentyal and FreeIPA: FOSS ID Management Options


In the past I have used OpenLDAP combined with Samba3 on CentOS 5.x for cross-platform, centralized authentication services (https://sites.google.com/site/fossvi/centos-5.x-smbldap-fix). Unfortunately that setup has become obsolete, so I have been searching for a more modern system to replace it. The most important criteria for such a system are:


  • - Freely available without licensing hassles
  • - Run on Linux servers
  • - Support Linux, Mac and Windows clients
  • - Use encrypted transport for credentials
  • - Easily deployed and maintained


I have so far come up with two likely candidates: Zentyal and FreeIPA. The purpose of this posting is to highlight some of the features of these systems and to discuss their pros and cons.

Zentyal 


Zentyal is based on Ubuntu Server LTS (currently 14.04), BIND9 and Samba4. It is intended to be a drop-in substitute for a Microsoft Windows Small Business Server. It's modular design allows it to fill any of several roles. For my purposes I used it as an Active Directory primary domain controller and CIFS file server. While it is a useful sub-set of an Active Directory server, it does not offer all the features that the Microsoft original does. On the other hand, the open source community edition is the right price (free), and there are no CALs to buy.

My testing of Zentyal was conducted on a virtual network built with Virtualbox on a Linux Mint 17 host. The clients were Mint and Debian Linux workstations  using the closed-source Centrify Express client software for joining the hosts to the AD domain. The "Express" Centrify clients provide only basic AD functionality, but again the price was right (free). Centrify Express can be used freely on up to 400 clients for educational institutions (200 for government and commercial institutions). Beyond that scale, or if you need fuller functionality, the full Centrify suite would be required (not free). Centrify offers their software suites (both Express and full) for Mac and Windows too. The full Centrify suite provides full AD functionality and more.

Zentyal clients are authenticated via Kerberos, with group membership and authorization information etc. stored in LDAP, just like Microsoft. LDAP and CIFS are provided by Samba4. A Zentyal server can participate as a primary or additional AD domain controller. Server administration is handled via a web interface running on the server, so you don't need a Windows workstation to manage the server.

Update (22Aug2015):

If you wish to join a recent release Ubuntu client to Zentyal (or any Active Directory Server) then there is a working alternative to Centrify. The "realmd" package is a front-end to sssd (or winbind, reputedly) that can be used to join Ubuntu to an AD domain. There is a good "howto" by Myles Gray on his blog entitled: "Utilising Kerberos/AD auth in Ubuntu 14.04 with realmd". For Linux Mint (v17.2 Mate), I had to tweak a few things to get it working, you can see my notes here.

Pros

  • - Easy set-up and management
  • - Provides standard AD protocols (krb5, LDAP, AD schema, DNS SRV RRs etc.)
  • - With Centrify, easy client enrollment for Linux, Mac & Windows
  •  - The "realmd" package makes joining a Zentyal/AD domain easy for Ubuntu & Fedora 


Cons

  • - Rigid organization structure
  • - Limited DNS functionality
  • - Can't be easily used as generic LDAP server
  • - Doesn't support IPv6
  • - Almost requires 3rd party SW for some Linux & Mac clients


FreeIPA 


FreeIPA is an open source system for ID managment developed by Red Hat. It combines the "389 Directory Server" (LDAP), with MIT Kerberos 5, BIND 9 and Certmonger/Dogtag (certificate managment). While FreeIPA is intended to provide secure ID managment for Unix-like systems, it is capable of providing one-way Kerberos trust relationships with Active Directory domains(AD to FreeIPA). FreeIPA is included in the core repositories (both client and server packages) of the common RedHat Linux derivatives (RHEL, CentOS, Fedora). The FreeIPA client packages are also found in repositories that serve Mint. For a "Howto" on enrolling Linux Mint clients you can go here.

Unlike Zentyal, FreeIPA does not "look like" Active Directory. It does however utilize the same basic approach, using LDAP storage and Kerberos authentication. Unlike Zentyal (and AD) FreeIPA can be easily used as a generic LDAP server. This ability allows authentication by many services that may be difficult to integrate with AD or Kerberos. For Ubuntu, Mint and Debian clients, I can use bare-LDAP authentication. In the past I have used bare-LDAP to authenticate Mac OS X clients (Tiger and Leopard). By using LDAP over SSL (LDAPS), I can have secure centralized authentication without resorting to 3rd party software. I lose the single-sign-on (SSO) capability that Kerberos enables, but  otherwise this is quite adequate in many situations. Beyond bare-LDAP, I was able to enroll Mint and Fedora clients in a FreeIPA/Kerberos domain. When enrolled within such a domain, client IP addresses are recorded along with SSH public host keys and host certificates (provided by certmonger/dogtag). There are no pre-built FreeIPA client package for Mac or Windows hosts. While there is documentation on how to go about manually configuring Windows and Mac hosts to enroll in FreeIPA, I consider those instructions to be too intricate and error-prone to be used by any but expert admins; Macs should readily be able to use bare-LDAP however.

Enrolling Mint clients only succeeded by *not* using sssd (the default setup used by freeipa-client) but utilizing nss-ldapd and pam-krb5 instead, plus manually adding one line to the pam session configuration file (to automatically create home directories). Once these steps were taken, everything went well and worked as expected.

I ran into a "hiccup" when attempting to enroll Fedora v21 (newly released while I was testing) with my CentOS v7 FreeIPA server. The FreeIPA version on CentOS 7 was v3.3.3, while the FreeIPA client version supplied with Fedora v21 was the newer v4.1.2. Enrollment completed, but several key pieces of information did not end up recorded on the server: DNS info, SSH host public keys, and host certificates. Authentication and authorization worked fine. This result combined with a reading of the FreeIPA FAQ leads me to believe that currently, FreeIPA client and servers should be in the same major release version (v3 or v4 but not mixed) for full functionality. I was able to enroll Fedora v20 in FreeIPA without any suprises (used the v3.3.5 client), and even upgrade it to Fedora v21 (via FedUp) without incident. So only the enrollment process seems to be affected by these differing software versions.

The CentOS/FreeIPA server that I used does not provide an integrated CIFS file service. Adding the schema and functions to integrate Samba4 are beyond my brief. File service options would be limited to SSH and NFS (the latter can be Kerberized NFS4). This is unfortunate, because neither of these protocols can be used (for mounted file systems) by newer Macs without 3rd party add-ons.

FreeIPA is managed via a web interface. This management interface is more full-featured than that of Zentyal. The BIND 9 server is more flexibly managed; I believe it could be used as a primary DNS server for small to medium enterprises, though I used it only within a sub-domain for testing.

Pros

  • - Easy set-up and management
  • - Can be used as generic LDAP server
  • - Easy enrollment for Ubuntu/Mint and RedHat/Fedora derivatives
  •   - Supports both IPv4 and IPv6
  • - Flexible DNS functionality


Cons

  • - No integrated CIFS file service
  • - No pre-built Windows or Mac clients
  • - Enrollment of Ubuntu/Mint client requires minor tweaking
  • - Client - Server enrollment is version sensitive


Conclusions 


Both FreeIPA and Zentyal are usable and useful. If you are dealing with mostly Linux clients I would use FreeIPA, with Kerberos (full enrollment) or without (as a bare-LDAP server). If you have some Macs, you could still use FreeIPA as a generic LDAP server, but the lack of CIFS file service will be limiting. If you have primarily Windows and/or Macs, then probably Zentyal along with Centrify client software would be the better choice.

FreeIPA's better performance as a generic LDAP server may make it easier to integrate with GADS (Google Apps Directory Service), although with passwords stored in Kerberos it means that while the accounts can be synced, passwords would have to be managed externally (true for AD and Zentyal as well).

Personally I like the "feel" of FreeIPA better than Zentyal. FreeIPA feels less restricted than Zentyal. The simplicity of the Zentyal management interface comes with the cost of less flexibility.

These two solutions have different target use cases: FreeIPA could manage a fleet of Linux virtual machines in the cloud, while Zentyal is a drop-in for a small business (or school) with Windows workstations. Both solutions are under active development and are bound to become better with time.

While both FreeIPA and Zentyal are useful solutions for central ID management, neither of them quite replaces the basic functionality of my old CentOS-5/OpenLDAP/Samba3 system, which provided authentication and CIFS file service for Linux, Mac and Windows clients (via Samba NT-style domain configuration), but also could be used as a generic LDAP server for use with Squid proxies, web and RADIUS servers etc. While the old system didn't provide Kerberos, and the single-sign-on it provides, it was still quite useful, reasonably secure  and didn't require a third-party client on any of the three platforms.

Update (15 June 2016)

I have received some tips that will allow Mint users to install FreeIPA just like Ubuntu and utilize sssd rather than rely only on LDAP. This information came from Brendon Bonner:

"Reading https://sites.google.com/site/easylinuxtipsproject/mint-cinnamon-first

1.2.1. Mint deviates from the Ubuntu way, where the so-called "recommended" packages are concerned. When you install software yourself, Ubuntu installs the recommended packages by default, but Mint does not.

This has two important disadvantages: in Mint, the features of the applications that you install yourself, can be needlessly crippled. And some how-to's for Ubuntu, don't work in Mint. All this for the sake of saving some disk space...

You can make things right like this:

Menu button - Administration - Synaptic Package Manager

Settings - Preferences - tab General
Section Marking Changes: tick: Consider recommended packages as dependencies

Click Apply

Click OK.

Furthermore, you need to change the setting "false" into "true", in the settings file /etc/apt/apt.conf.d/00recommends. That's easiest to do in the following way:

Menu - Accessories - Terminal

Copy/paste the following command line into the terminal, for example by a right-click with your mouse (this is one line!):

sudo sed -i 's/false/true/g' /etc/apt/apt.conf.d/00recommends

Press Enter. When prompted, type your password. Your password will remain entirely invisible, not even dots will show, this is normal.
Press Enter again."


Links